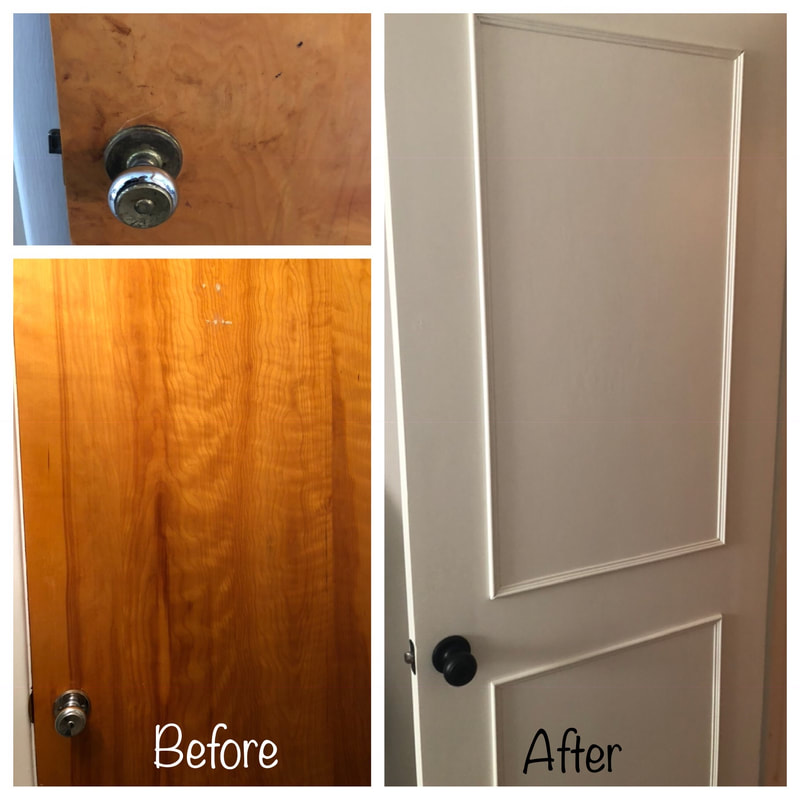
While walking through our home when we first purchased it in 2019 all I saw were those terrible, orange poly-finished doors that desperately needed to either be replaced or repainted.
One of the first things I wanted to change in our home was those dang orange wooden doors. They were screaming at me for help. I could not afford 7 (10 if we count closets!) brand new doors so with the extra time I had during Covid, I decided to go ahead and try painting them and adding trim myself. I am so happy with how they turned out!
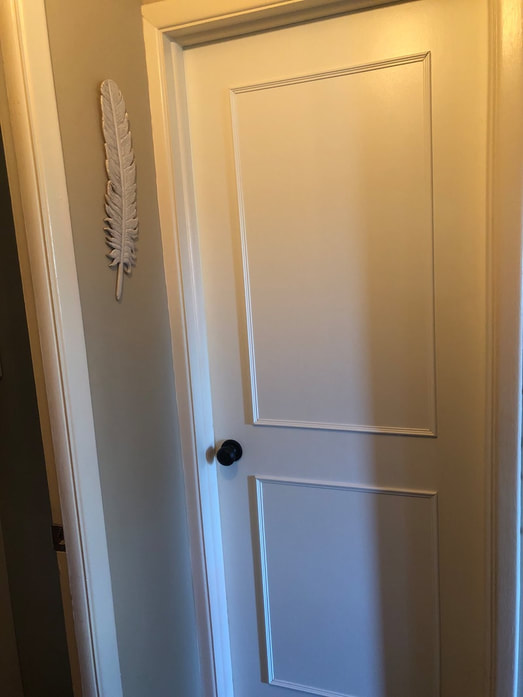
After adding paint and trim
Amazon Supplies:
Door Knobs Door Hinges When getting new hinges be sure they are the exact same size as your previous ones or your doors may be crooked and not close properly (there are also tools out there that cut the perfect depth for door hinges but I did not know this until after this project) Home Depot Supplies: Wood Trim Paint Hand Saw and Miter Box for angles (my other circular saw broke right before this project and I did not want to invest in a new one yet) White Paintable Caulk Glue/Liquid Nails Dewalt Orbital Sander Other Supplies: Painters tape Pencil Ruler/measuring tape Electric Drill Painting supplies (roller and brush) I would go with a foam roller for a smooth finish. If you are like me and want to paint your hollow wooden doors instead of purchasing new ones, here are the steps I took: 1. Decide whether you want to paint with the doors still on the hinges or if you want to take them off the hinges. I found it easier to do it off the hinges since I was sanding them first. I also did not want to breathe in the sanding dust and have it be all over my house. **if you are taking your door off and putting it back on, you may need an extra set of hands to help. I did this by my self and ended up using a couple pieces of cardboard underneath my bottom edge of the door so when I unscrewed that last screw on the hinge the door would not fall. Doors are heavier than they look. 2. Sand your hollow doors: front, back and edges. 3. Wipe clean your sanded doors and make sure there is no dust or debri on them. 4. Paint your door (without the trim on it) I ended up using 2-3 coats of paint and lightly sanded the door between each coat because I want this paint to last as long as possible. 5. Measure where you want your trim. I marked lines/spots at each corner edge where the pointy ends of the pieces would meet. ***This was the most time consuming part for me since each door was a different size in my house (Ugh! Can you believe that?!). I measured so that the edges of my trim(the thicker side of my trim) would be 5 inches from the left and right sides of the door edges. 6 inches from the top/bottom edges and 6 inches in the middle between each rectangle. 6. Cut your trim pieces at 45 degree angles with the narrower edge being shorter. So use your thicker edge of the trim to measure/cut your angle from. 7. After your trim is cut: sand it gently, wipe clean, and then paint the top and the cut edges. 8. Once your door is completely dry, hang it back up on the hinges if you took them off. (When getting new hinges be sure they are the exact same size as your previous ones or your doors may be crooked and not close properly) 9. Using liquid nails and a caulk gun apply adhesive to the back of your trim piece and press into place with the pointy ends lining up with your measured marks on the door. 10. Using 2 or 3 pieces of painters tape: firmly tape each trim piece into its spot and do not remove until the adhesive is dry. This helps prevent any warping from happening too. 11. Add caulk to spaces and gaps between the trim pieces and finish with a layer of paint to make the look seamless. 12. You are done! After 2 years with these doors painted I have only had to touch up a couple spots which were caused from moving furniture through the doorways. White paint (just like any other non painted white door) also needs some cleaning once in a while because of fingerprints and whatnot on such a light colored surface. Those are the only issues I have had. One thing I would change if I were to redo some of the door: I would use a smoother roller (a foam roller) with no texture. I did not use one at first. I hope this helps other DIYers out there! Nicole
0 Comments
Leave a Reply. |